Photobucket Photobucket Photobucket Photobucket Photobucket Photobucket

December 6, 2011

Trimming the tree

Wow! I can't believe how long I have let this blog go. In my defense, my computer was acting up and I couldn't upload any pictures. I think I have made a temporary solution but things still need fixing around here. I could only upload a few pictures so I thought I would just share our Christmas tree this year. 


I grew up with a real tree and my Husband grew up with a fake tree. I always was against the fake tree, but finally gave into it when our real tree kept dying way before Christmas every year! I found a killer deal on our tree a few years back at Tai Pan and I couldn't resist. I love my tree and am so glad with our decision to go fake. One bonus to the fake tree is that it can stay up longer. I love our home at Christmas and love that the decor can stay up for over a month. That being said, we always deck our halls the day after Thanksgiving!

Here is our tree this year...


Notice our elf hiding in the tree? Here is a closer look...


I believe that my tree is a work in progress. Every year I think it gets better and better as I add a little bit to it. This year I added the berries (as you can see in the above pic) and a new star. The star came from Hobby Lobby and the berries came from an old garland I had in storage.


Last year I added these candy cane balls...


and the year before that I added these disco balls...


My favorite thing on the tree probably are the giant bells and the jeweled butterflies...


Another thing I added this year was the tree skirt.


I found a tutorial on HGTV explaining how to do this and just tweaked it a bit to make it my own. They used hot glue to attach the ruffles and I just sewed them on to make it a bit more durable. They used canvas for the bottom of the skirt and I just had a huge felt piece that I used. The green fabric I used in years past as my tree skirt and just bunched it together.


It actually used to be a table cloth used at the Academy Awards... THE Academy Awards!! My Mom picked these up at a huge warehouse sale in LA and we used them for my wedding. She gave one to me to keep and it is so huge that I could never find a use for it, at least until now! I was a bit sad to cut it up, but I knew I would be much happier with the outcome.


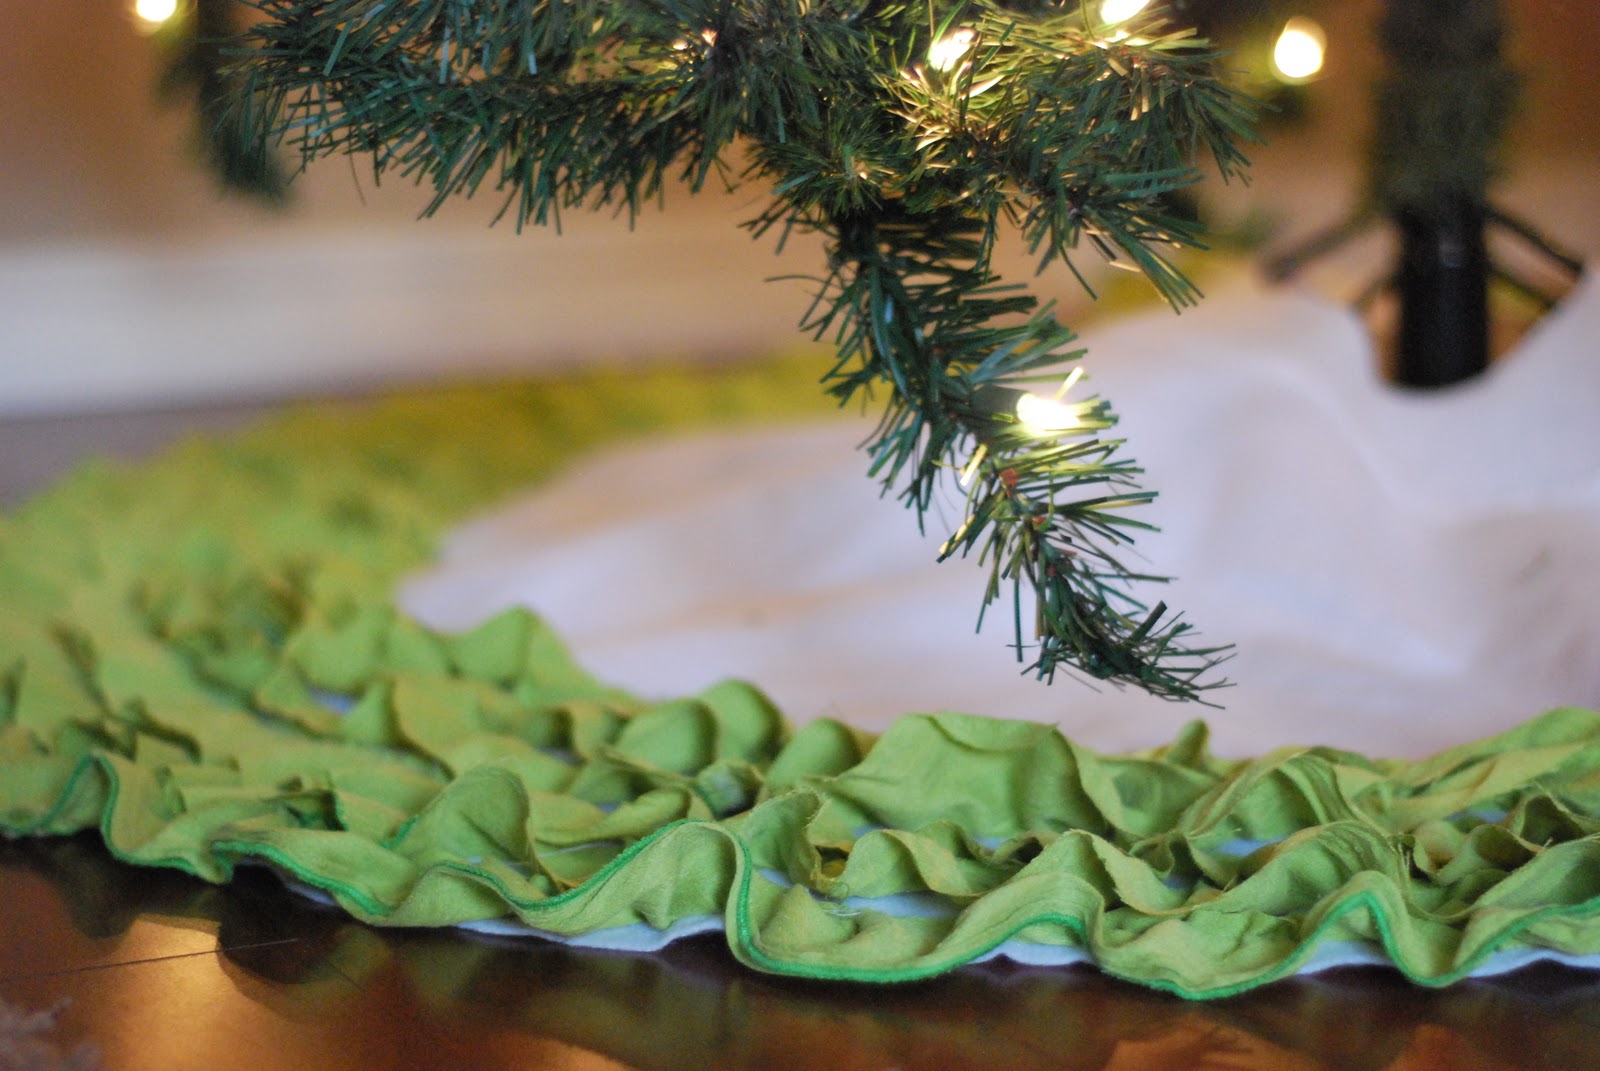
I still have about half of the table cloth left and I can't decide if I want to keep going and fill the whole skirt with ruffles or just leave it. What do you think?

I have so much more to post about and hopefully I can stay on top of it...if my computer cooperates:)

Linking up:
With a Shot of Brandy
Katherines Corner
The Charm of Home 

November 28, 2011

My apologies...

I am sorry I have totally dropped the ball on this blog! I have had zero motivation to blog and have been a bit caught up in the holiday shopping going on. I will be back soon with some more updates, but until then don't forget about me :)

November 18, 2011

Winner Announcement

I am pleased to announce that the winner of the Roberts $25 coupon is my old highschool friend Kelly Moody!!

Congrats Kelly....I will give Roberts your email and they will send you the coupon :)

November 16, 2011

Thanksgiving Table Settings

Thanksgiving is such a wonderful time of year. These is so much about this holiday that makes me feel all warm and fuzzy! With Thanksgiving just about a week away I thought it would be a great idea to share some beautiful pictures that I came across to help you plan your Thanksgiving table setting.

Martha Stewart knows how to do Holidays right. 
This picture is a favorite of mine because its so simple. 
I just love the mixture of creams and whites.


How would you love to sit down for an elegant meal at this table by Fall Weddings?


I love a table setting that is personalized. 
Better Homes and Gardens created this unique setting by using a paint pen to write each guests name on a pumpkin.


 Also Groopdealz is doing a deal today for these adorable chalkboard place settings, just $10 for 6!


I found this picture on pinterest but couldn't find the original source. 
This would be fairly easy to do....just wrap candle with craft paper to spell out "giving thanks".


Another beautiful setting by Martha Stewart. 
I love the touches of gold!


Now here are some fun ideas for a kids table. 
This setting is all over pinterest and would be so fun for the kids.
Click here to read all about it!


Shindig Parties To Go created this free printable kit. 
I got it saved and can't wait to use it on our table :)


Now if you want to get real crafty you can try out this amazing center piece from Martha Stewart. 
The kids would love it!


I have one last picture to share and its from Bee in our Bonnet. She shares on Eighteen 25 how to make these adorable sugar cookie place settings...they could be used for the kid or adult table :)


And there is my compilation of pictures. 
I hope some of these can help you get some great ideas for this Thanksgiving. 

Also don't forget about my giveaway going on right now. 
Last day to enter is tomorrow!!

November 11, 2011

Its giveaway time!

Well as promised I have an awesome giveaway starting today! Those of you who live outside of Utah probably don't know about Roberts Arts and Crafts so here is a little bit about them...(I pulled this info off of their website)


"Roberts Arts and Crafts is a specialty retailer offering a wide variety of crafting items ranging from fine art and floral merchandise to scrapbooking, wedding and the latest in home décor trends. Roberts also boasts the largest Cricut® selection in Utah and Idaho. We are devoted to being your favorite place to shop for arts and crafts. We want to help you make your creative ideas come to life. With our wide variety of cutting edge products, classes and demos, project ideas, and events; we help you create projects that you and your loved ones will treasure forever."

Their website is loaded with over 40,000 products for every craft imaginable. Even if you aren't into paper crafts, they have cake decorating and sewing products and even wall stencils. I am telling you there is something for everyone! 


So what are they giving away? Well they want everyone to benefit from this giveaway so they are generously giving one reader a $25 coupon code to use on their website! Use this on a new scrapbook or cake mold or put it towards that cricut that you always wanted! All you have to do is leave me a comment! 

For extra entries follow my facebook or twitter page and like Roberts on facebook for a total of 4 entries each.  This giveaway closes on Thursday November 17th at Midnight. The winner will be announced on Friday the 18th. Good Luck!!

November 9, 2011

Switching up seasonal decor

For some people it may be hard to make the switch from Halloween to Thanksgiving decor, seeing as they are somewhat similar. I know for me in years past I would either skip Thanksgiving decor all together or just keep my Halloween decor up through Thanksgiving, both probably out of laziness :) Well I have realized that with a few simple switches you can change your Halloween decor to Thanksgiving for practically free!

First thing I changed were these candlesticks.


I was a bit worried about having black candlesticks for Thanksgiving but I think my small switches made it work.


I changed the black and white ribbon to brown ribbon and replaced the jack-o-lanterns with candles that I already had.

Next up was the kitchen table. My decor went from this...


to this without spending a dime!


For the table runner I just used scrap pieces of fabric that I already had. 
To make it I just cut the scraps into 2 1/4" strips and sewed them together.


When sewing the strips together be sure to alternate which side you start your stitch on. 
This keeps your runner straight!


Once I sewed the strips together I attached a few strips to the sides to create a border.


Lastly I added some white material to the back. Sew all edges together inside out making sure to leave a small gap to turn it right side in.

The last step is to iron the whole thing and then stitch over the small opening. And then you are done!


The last thing I did to switch out my decor was change up my mantle from this...


to this...


There are so many sites out there with free downloads that you can just print off on your computer or to save ink you can send them somewhere to print. I got this banner from At Second Street for free! 

My husband found these lanterns at a yard sale a few weeks back. 
I love them and use them everywhere!

I already had the glass vases and just went outside and grabbed these "weeds". 
I love how it turned out!

And that is how easy it can be. I literally spent $3 dollars to print the banner and everything else I already had.

Be sure to check back on Friday for another giveaway!!!

November 4, 2011

Kids Bath Feature!

Hello everyone, today I just wanted to let everyone know that I am being featured over at Remodelaholic. They are featuring my  kids bathroom redo...click their button below to check it out :)


November 2, 2011

Studio 5 Segment

Well today my segment finally aired on Studio 5. For those of you who missed it or live outside of Utah, here is the video!


For more detail on my laundry room redo click here!

Also here is another short video by Tip Junkie on updating your laundry room. You might see a few pics from my laundry room :)


Enjoy!

October 26, 2011

More Halloween Decor

I think it is really easy to get carried away with holiday decor. 
In my house I enjoy decorating for the holidays but I try to keep things simple for my own sanity! I find that if I have more than little touches here or there than I get so sick of it before the actual holiday even arrives. So here is a look into the bits and pieces of my Halloween decor. 

The mantle:
Our family room has a beautiful fireplace right in the center of it. Our TV takes up so much space above it that I really have minimal space for decor. This is what I came up with this year...


I showed you here how to make the garland. The pumpkins and "boo" sign came from Hobby Lobby, the candle sticks came from Target, the "trick or treat" blocks I made years ago and I just had the black frame sitting in storage. The "boo" sign was originally black (if you noticed in the above pictures they are different colors) but I spray painted it orange to make it pop more.  I really like how every thing came together. Its just the right amount of Halloween for me :)


The Kitchen Table:
Back when my neighbor and I had a craft day and made the garland, we also made this table runner.


We got the idea from this tutorial but ended up making up our own pattern. We got as much material as listed on the tutorial and then cut down our runner almost in half. In the end we had sooo much left over material that I was able to make another runner and still have stuff remaining!

Again keeping things simple, I put my rod iron pumpkin in the center of the table and covered it with spider webs using a hot glue gun. I found the giant spider at walmart for $3!


I have this little side table between my family room and kitchen area that I like to use for decor.
I put my second runner here and filled my candy plate with some of my favorites...caramel and chocolate covered raisins. YUM!


The candy didn't last long...the plate is now empty :)

I love framing pictures from previous Halloween's. Its so fun for the kids to see their old costumes and it makes for inexpensive decor.


The Front Room:
In my front room I try to keep Halloween decor to a minimum. 


I keep it limited to 3 items:
These gourds I got on clearance from Tai Pan years ago.


I made these pumpkins a while back at a church activity...


and lastly my "eek" candle holder...


As you can see I really don't have a lot of Halloween decor but I still feel that my house is festive and ready for Halloween!
Related Posts Plugin for WordPress, Blogger...